Saturday 28 April 2012

Masking and Stamping by Frankie Gaywood

Hi everyone, it's my last time to share my guest spot with you, but I hope they ask me again (!!!) cos I have been thrilled to see your reactions to my work, so thanks everyone who left me a comment here, and those who also left one on my personal blog...

So...  what have I done for this last post? Well, I decided to share the masking technique with you ... many of you will know this one, but some may not, and many of you will have forgotten it. It allows you to use your stamps in whole new ways, and that has been my theme this month... I will put a list of the stamps used at the end of this piece, so you can hop over to the Artistic Stamper site, and get some for yourself... tee hee!!
To begin with, I decided on a theme of postcards, and had chosen some bird stamps as the main images. I used my deckle edge scissors on 2 pieces of shiny cardstock, and crimped around both bits, stamping one card with the post card stamp and a postage stamp.  I drew the line with a sharpie pen.
Next I stamped my birdie images in archival black then embossed with clear embossing powder. Then, I  attached my masking paper... you can see where I had already had a practice 'cos the paper is overprinted with brown...
Having masked all the bits I wanted to stay clean and clear, I inked up the music background stamp with sepia archival ink, and printed just off centre, over my masked pieces.
Here it is with the finished overprinting, and the masks removed - simples!!!
The next process was to ink and distress the background, which I did with old paper distress ink. Then I did the sprinkle thingie - you know, when you spray  clear water on to your fingers then splatter it on to the ink. I used a roll of kitchen wipe, that I keep for just such a purpose, to blot up the excess water, to leave spots of lighter colour.
I stamped a ickle postie card and letter and distressed them in a similar way. The uneven dotty stamp came in very useful for adding age dots to my piece. For this I used frayed burlap and bundled twigs.
And this is the finished article, all mounted together on a distressed background, and made to look like a set of old letters and cards in a pile...
My Tim Holtz paper distresser came in handy here!!! I used it quite heavily to rip and tear too!!
This is the main image close up, showing the distress and "mould" spots and
This is the whole thing full on to the camera...

I hope you have enjoyed seeing this ickle card get made, and how the background stamps can be used differently, overstamping with masks... I also hope that I will see you again very soon, either here or on my own blog, where I would love to share some more pieces with you... meanwhile, get inky and ENJOY!!!
Love and light
Frankie
xx
Those Stamps
ephemera plate
postage no1 plare

Thursday 26 April 2012

HOME IS WHERE THE HEART IS, Frame

Hi all Kat here,
I am very excited to show my first piece of art work showing off my first ever set of stamp designs,
still having to pinch myself about it,
I hope you like them cos there's more on the way, fingers crossed.
here it is,

the frame was painted with black acrylic paint
& aged with a bit of inka gold in antique silver,
the images are from my stamp sets HERE
I have my own button on the website entitled
kat's creations how cool is that!
every thing is stamped with Jet black archival ink
& coloured with a verity of Distress Inks
I used the stipple background 
to give a bit of texture to the sky.

here are some close ups of all 3 panels.


Hope you like it!

if you are wondering where I have been
I have put a brief explanation on my blog 
for those of you that would be interested to know.

I would love to know what you think about the house stamps,
please leave me a comment
hope to be back to full capacity very soon
thank you for being so patient,

Kat x.


Wednesday 25 April 2012

Home Sweet Home by Alison

Hello Stampers! This week I've been playing with Kat's gorgeous new stamp designs, which can be found HERE.


My base is a little 3.75 inch square block, 0.75 inches deep. I covered the front & sides with Ideaology Tissue Tape, then inked it with juniper & willow Alcohol Inks. If any pieces of Tissue Tape don't want to stick, just glue them down with some Studio Matt Medium.


Next, I took some silver Ten Seconds Studio metal sheet, & stuck it to black card, using Humungo Tape. I stamped the houses, flowers & phrase from Kat's Creations Plates, using jet black Stazon ink. I dried this with a Heat Tool, then traced around the houses & flowers with an embossing tool. I cut out the images, leaving a small border, then used a Wheel Tool to edge them. 

I painted the images with Alcohol Inks Lights, using a fine paint brush. I did this very lightly as the alcohol inks tend to react with the stazon. Finally, I used Studio Matt Medium to glue the images to my base.

Thanks for looking,
Alison xox

Sunday 22 April 2012

Make your own memories by Sioux Jenneys

Hello everyone! I'm sharing a card today :)


1. I stamped the arched window from the Architecture 1 057 plate in Archival coffee onto a square piece of card then colourised the edges with Distress Ink brushed corduroy.

2. Stamped the word door key from Time and Keys plate in Distress Ink worn lipstick and mounted this onto a mat colourised with the same colour.

3. The border round the card was created using the A6 borders 2 plate that had been inked with brushed corduroy and worn lipstick.

4. The journaling mini words were added and I utilised another word "Own" from No Bird before mounting the whole thing on a larger mat colourised with the brushed corduroy again.


See you again for the May monthly challenge.....ooh er May nearly here already!
xoxo Sioux

Friday 20 April 2012

Friends Together by Emma


Hi everyone!

I hope you've all had a lovely week and now, you're looking forward to the weekend. I'm here to share my final post of the month and today's creation is a tent card featuring another of the gorgeous Mabel Lucie Attwell stamps. I hope you like it...
To begin with, I made the tent shape from black card. I then inked the "It's My Balloon" stamp with black Archival ink and stamped onto watercolour card, before handpainting the image using Distress Marker Pens, scribbled onto an acrylic block and applied with a water brush. I blended Antique Linen Distress Ink around the edges for an aged look and then matted it onto layers of black and cream card before attaching it to the front, folded section of my tent card.
I embossed some cream card, (blended with some more Antique Linen DI) using the Harlequin Crafter's Workshop Templates and then with the stencil still in place, I blended Stormy Sky DI through the stencil. Remove the stencil, distress and tear the edges of the cardstock and matt onto some black card. Add Vintage Photo DI to the distressed edges. I then attached the completed background to the back of my tent card.
I added some words from Tim Holtz's Chit Chat Stickers and a paper roll to the bottom of the card. Finally, I dyed some cream seam binding using Chipped Sapphire Distress Stain, tied it into a bow with some twine and added it to my card for decoration, together with some buttons.
Thank you for stopping by to take a look and I always love to read all your comments and can't thank you enough for taking the time to leave them!

Don't forget that we still have our DT call, which you can find details of HERE and you have until the 30th April to contact us!!
Have a lovely creative weekend.
See you soon.
Emma x

Wednesday 18 April 2012

Create Canvas by Alison

Hello Stampers! Today, I have a steampunk canvas to share with you.


I started off by applying a thickish layer of Studio black gesso to a 6x4 inch canvas board. I dried it slightly so that a skin formed, then stamped various steampunk images into it. Once the gesso was completely dry, I painted it with red pepper, aqua & gold paint dabbers.


I used Tim's Alterations to die cut a variety of cogs, then double embossed some with bronze UTEE & some with platinum UTEE. Whilst the UTEE was still molten, I stamped into the bronze cogs with a clock image from the Tick Tock plate, & the platinum ones with the mini lattice wire background. I layered some of the cogs with Ideaology gears & game spinners, then glued them to the canvas, using Studio matt medium.

I stamped the 'Create' definition onto cream paper, edged it with the aqua paint dabber, then distressed the edges & inked with walnut stain distress ink. I used matt medium to glue it to the canvas.

Finally, I used a cropadile to punch two holes in the top corners, then added eyelets & some chain to hang my canvas.

Thanks for looking,
Alison xox


Saturday 14 April 2012

Triple Embossing... by Frankie Gaywood

Hello again, stampers. It's my turn again, to share a piece with you. So, for my second project, I would like to take you back to what hooked me on stamping and crafting, a trillion light years ago!! Embossing powders, and triple embossing in particular. I watched in wonder and amazement whist the alchemy took place, and HAD to do it for myself!!! Been fascinated ever since...

Once again, I took out my yummy background stamps, a few colour-coordinated powders, some pre-cut chipboard shapes and a few pieces of stampbord. I began with a rectangular base board and smooched it with distress inks, then set it aside.
Then, piece by piece, I embossed each one with clear, ultra thick embossing powder. This means you don't have to use as much of your pretty colours to get the depth you need!!
Next, whilst the clear was hot, I sprinkled my jewel colours and heated them.


I inked the stamps with versamark, or gold ink, then pressed into the hot embossing powder. A few seconds later, they could be lifted, carefully, and the wonderful indentations and patterns became obvious... joyous moments, each time!!

Finally, I rubbed the edges and texture of each piece with Inca Gold copper and gold pastes, then set them out in the order I had decided upon... Got to love my new crafting gloves for poorly arthritic paws, eh!!!??

And there we have it - a jewel-like wall hanging, which glows in the sunshine, and is full of delicious texture and pattern.
 This is the dots background stamp and a screw- head brad. I made 4, 1 for each corner.

 Here is a Tim Holtz Idea-ology piece, an ornate plate adorned with buttons, beads and a tiny grunge paper rose.

 Here are the gears and caligraphy background stamps. Also the time and keys plate.


Here we can see the idea-ology piece close up, and the grid background stamped with gold. I love the texture where the hot UTEE has bubbled passed the grid marks!!

And this is the complete piece. It is very pleasing to look at, in real life, because of the texture and deep jewel colours, even if a couple of the shapes look a bit like chocky biccies!!

I hope you have enjoyed looking how this project was made?? If so, please leave a comment. I also hope that not too many of you think I have taught you to suck eggs!! But I often hear people saying that triple embossing is hard to do/understand. Doing small fragments helps you to have a go without being worried about it!!!

Next time I see you here, it will be with my final piece as your guest designer, so have fun until then.
Love and light
Frankie
xx

Friday 13 April 2012

New Stamps from The Artistic Stamper

It is silly o'clock here at Artistic Towers, the big white van is packed to the roof for the London show, and I am very excited at taking our new stamps to the show! The lovely Kat Fullman has designed three brand new sets, with more in the pipeline.
 They are now available online to buy, and of course if you are coming to The Big Stamp & Scrapbooking show at Ally Pally, you will be able to get them there! Here is one of them...


Home Sweet Home © Kathleen Fullman


pop over here to see the rest!
I just wish I had had time to play with them.. but will definitely be using them this weekend! If you fancy being in with a chance to win this set, then I have a giveaway on my personal blog here.
Have a very creative day, and if you are coming to Ally Pally, please say hello ( I won't know you have been there unless you speak to me! lol)
Hugs
Jennie

Thursday 12 April 2012

Attitude by Sioux Jenneys

Hello everyone! It's a card from me today :)


1. Stamp the fabby new Sneaker#1 stamp by Laura Liddell in Adirondack pigment sunset orange then over stamp it again with coffee Archival.
(Laura did this on her blog and I've been dying to do the same it's a great effect)

3. Colourise the edges with Distress peeled paint and brushed corduroy and add some of those fabby new Journaling  mini words#1.

4. Layer up the mats edging each layer with a black marker and attach to card.

5. The word Attitude from my dance plate ;) was stamped round the edges and a little star of my own was added in Adirondack pigment sunset orange.


See you again soon!
xoxo Sioux

Tuesday 10 April 2012

Let There Be Light by Emma


Hello everyone!

Hope you all had a lovely Easter weekend and enjoyed your choccie eggs. For my first post and share of the month, I decided to make a tealight holder, (using a battery operated tealight...not one with a real flame) using up odds and ends that I collected in my crafty stash for "one of those days that they might come in useful times"! I hope you like it!

To begin with I inked an old unwanted CD with Citrus and Sunshine Yellow Alcohol Ink and then used Glossy Accents to attach a plastic dessert container, which I knew would have a new purpose in life one day, to the CD. I then stamped the Flower Power Stamp Plate and stamped various sized blooms onto Grungepaper to create the flowers to go around the base of my tealight holder.
I then applied Tumbled Glass and Dusty Concord Distress Ink over the stamped flowers before making them into 3D blooms. Next, using the Movers and Shapers, Mini Butterflies die and the On The Edge Butterflight I die cut the images and applied Wild Honey and Fired Brick Distress Inks over them. I inked up the Dots Background stamp with Black Archival ink and stamped directly onto the single butterflies and finally, die cut the Mini Branch and Leaf and blended them with Peeled Paint and Gathered Twigs DI.

Now, all you need to do is wrap the On The Edge Butterflight die around the base of the plastic container and attach the grungepaper elements onto the Alcohol inked CD, using Glossy Accents. I added the Grungepaper die cut butterflies onto small folded pieces of acetate to give the appearance of them in flight.
Finally, I stamped the Butterfly Words quote onto a piece of card, blended with Tumbled Glass and Vintage Photo DI and attached this using a Memo Pin Idea-ology Fastening.

So, that's about it from me for today...I hope you feel inspired to get inky and start creating. Don't forget that we would love to see your creations in our RIBBONS AND LACE challenge ~ you have until the end of APRIL to submit your entries. We also have a Creative Team Callout and if you would like to join our very talented Creative Team and show us your creations here on the blog, then click HERE for all the details of how to apply!!
See you again very soon!
Bye for now.
Emma x

Sunday 8 April 2012

Friendly Plastic Frame by Alison

Happy Easter Stampers!
I adore friendly plastic, & today I have a little frame to share with you.


Friendly plastic comes in strips, measuring 7 x 1.5 inches, & I used almost one strip for my frame. To start, I cut a piece of black fun foam, about 1.5 x 1.75 inches, then cut two 2 inch pieces from my friendly plastic strip. I laid one piece on my craft sheet, then cut half an inch lengthways from the other piece, & laid it next to the other on the sheet. I heated it with a heat tool until it had a cracked surface, & the two pieces were melted together. Then I pushed the black foam piece into the centre. Wet your fingers with cold water & mould the friendly plastic around the foam. Be careful, as it will be quite hot to touch. Before it cooled, I wet the tip of an embossing tool, & added some dots around the edge.

Next, I took the leftover 2 x 1 inch friendly plastic piece, laid it next to another 2 x 1 inch piece, & added a 2 x 0.25 inch piece at the bottom. Once this was melted together, it was 2.25 x 2 inches. Whilst it was molten, I laid 2 filigree metal squares to the top & bottom, then pushed the first friendly plastic frame into it. Before it cooled, I wet a Ten Second Studio Wheel Tool, & used it to add texture to the edges.

I stamped one of the statues from the Architecture 3 Plate, inked it with vintage photo distress ink, then cut it  to fit inside the frame. I only used part of the image. I added more colour by painting with blue & orange Inka Gold. I glued the image inside the frame with glossy accents, then once it was set, added a layer of glossy accents over the top.

Once the glossy accents layer was set, I added blue Inka Gold accents to the highlight the texture on the edges, then I filled the little dots on the inner frame with blue stickles.

Sorry about my long-winded instructions this week, I hope they have made sense & encouraged you to try out friendly plastic, if you haven't before!

Thanks for looking, enjoy your chocolate eggs!
Alison xox

Thursday 5 April 2012

Femme Fatale by Sioux Jenneys

Hello everyone! It's an A4 size journal page today in my lovely "new" old ledger journal :)


1. I spread some gesso all over and the page was then spritzed with mini misters containing Distress Ink mixes in wild honey, broken china and antique linen.

2. I used a baby wipe to swipe some Inca Gold in lava over a Pomegranate mask in two corners and the residue was dragged across the other two corners.

3. I used the open banner from the new Borders A6#1 size plate and stamped it with Adirondack pigment wild plum....wrote the wording with a black marker and added a thin black line on one side of each banner to help make them pop a bit.

4. A mixture of the diamond borders from the Borders A6#1 and Borders A5#1 plate were stamped in Archival sepia.

5. The words Woman, Secrets, Mystery and Desire are all from the Nudes A4 plate and were stamped in Versafine black.

6. The picture of that gorgeous dress... ...(that I so wish I could get a way with wearing ;))... ...had some white wording going through it so I used some green ink to go over them and carried on to make the words vital info.....


Ooh! I can't put into words how happy that page made me :) See you again soon!
xoxo Sioux

Wednesday 4 April 2012

Creative Team Challenge winner!

Hi! It's the Chief Stamper here again, bringing happiness and good fortune this month to one lucky blogger!! Seriously though, I am here to let you know that we love all your artwork and your comments on the Team's creativeness every month. Of course there can only be one winner every month, and this month this gorgeous piece by


has won our monthly prize of £15.00 worth of stamps! Congratulations Aisling, Please email me, so you can choose your stamps :)
Don't forget that April's challenge is happening now...Ribbons & Lace, and we love to see what you create, just remember to include some stamping too! If you think that you might like to join us, then we have a Creative Team call, just click here to join in, and you never know.....

In the meantime have a very creative day,
Hugs
Jennie

Monday 2 April 2012

Mokume Gane - Stamping with a Difference by Frankie Gaywood

Woo, I am so excited to be bringing you my first piece on this wonderful Artistic Stamper Creative Blog!! So, stamping... yes it is, but with a difference. As the title suggests, it is actually Japenese and is a metal working technique, to make wood grain effect in metals. I am using it with polymer clay, and I want to share 2 projects with you. It is quite photo-heavy, so get a cuppa and enjoy.

 So, on the desk is a whole lot of new clay and all the tools I need to get going., including my pasta maker.

 Each pack needs to be cut and then -

 popped into the pasta machine to be conditioned...

 When all my colours were conditioned and softened

 they were cut and layered with each other and with some gold foil... is she ever getting to the stamping, I hear you cry!!  Yes I am so see below...

I lay the mini polka dots background stamp on top of the stack and pressed down hard to imprint the image through the clay. The beauty of this technique is that you never really know the beauty of what you have made until you cut into the stack...

 I slotted some orange clay into the stack then started to slice...

 The blade slices as thin slivers as possible, being careful not to cut your own fingers!!!! Tee hee...

 So I used the mini polka dots and the cogs background stamps - yummy deep-etched rubber and below it is possible to see their influence!!

 This slice shows the cogs and the dots beautifully...

On another stack, I used the grid backround stamp and made some holes with my pokey tool!! Just look at the wonderful clay markings that produced...
 Beautiful squares of colour... and such texture...

 So I wrapped some beads made from spare clay. I will make something with them and show you the finished articles in a later post...

 Here are some of them, surrounded by a bracelet I made recently. They will match beautifully...

 Woo, such lovely colours and swirls, and I LOVE those cogs and squares!! Great stampimg!!

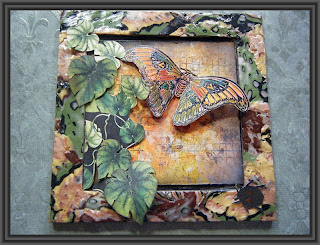
 With another stack, I decided to create a frame for one of the 15cms collage alterable frames. I laid thin slices around the edge and trimmed ...

 Look at the bright sunshine streaming in through my craftroom window... and the frame finished and waiting to be "cooked""... I use my halogen oven, it's quick and easy and less costly than my large cooker.

 I made a Tim Holtz-type background with distress inks and stamping using the dots and checks background stamps, and then added the teeny tiny butterfly. The beetle in the bottom corner and the beautiful large buttlerfly are from the same plate called insects and butterflies.

The leaves are from the Graphic 45 Tropical Paradise Pad. I fussy cut them. I used the pad because my frame reminded me of the paper when it was finished...

Well, I thoroughly enjoyed sharing my first project of the month with you, and look forward to seeing you all again soon, in a couple of weeks.
Love and Light
Frankie xx